Fabric Formed Concrete Fire Table

ONE: FORMING

The formwork does not need to be exceptionally strong because this is a hollow, fiber-reinforced piece. The form is constructed from 3/4″ Melamine that’s been ripped to size on a table saw.

What You’ll Need
What You’ll Need

Step 1 – Burner Knockout

  • The knockout for the burner assembly is cut from 1″ thick insulating foam.
  • It is 1/2″ smaller than the outside rim of the burner. This gives the burner a 1/4″ wide lip to drop down onto.
  • The perimeter of the knockout can be covered with 1″ wide edge-banding to hide any imperfections in the foam.

Step 2 – Control Box Knockout

  • The Control Box door will be installed in the side of the piece, offering access to the on/off valve for the gas burner.
  • The knockout is cut from 2″ thick insulating foam and then faced with smooth laminate. The laminate is glued to the foam using contact adhesive.
  • A larger square is cut from luan, which will create a small recess so the control box mounts flush with the wall of the fire table.

Step 3 – Burner Knockout 2

  • A foam disc is needed to create a bump to stretch the fabric over. This disc is mounted directly to the baseboard and the fabric is stretched over top.
  • The disc is made from 2″ thick insulating foam that is glued together. In total it is 4″ thick and 1/4″ larger than the diameter of the rim of the burner.
  • The additional 1/4″ will provide enough room for the burner assembly to drop easily into place.
  • The foam disc is topped with a disc made of 1/4″ thick Luan. This will give something for the screws that hold the burner knockout something to bite into.
  • After the knockouts are completed, the thick disc is adhered to the baseboard using contact adhesive, silicone, or similar.
Step 4 – Fabric Form
  • One continuous piece of fabric is needed for a project like this.
  • The fabric is laid across the form and pulled tight to one side.
  • It is helpful to have someone pull the fabric tight while another person staples it in place.
  • Using a heavy duty stapler, wrap the edges of the fabric under the baseboard, and staple in from below.
  • Staples in the edge of the baseboard will interfere with the form walls. Avoid tearing or ripping the fabric during this step.

Step 5 – Fabric Form

  • It may be necessary to remove some staples to adjust and reattach the fabric.
  • The staples holding the fabric should overlap each other. At minimum, there should be a 1/4″ gap between them.
  • When the fabric is tight, trim and discard the excess.
  • Center the 1″ thick burner knockout on the bulge and secure it with Foam-Lok adhesive and a few drywall screws.

Step 6 – Form Walls

  • The form walls are cut on a table saw from 3/4″ melamine coated particle board.
  • In this project they are about 16″ tall.
  • The form walls should be as tall as the deepest part of the burner assembly, in order to hide the plumbing from view.
  • Take care not to tear the fabric around the edges when installing the form walls.
  • The form walls are screwed into the edges of the base board using 1-1/4″ drywall screws. Pre-Drill and Countersink them.

Step 7 – Install Feet and Control Box Knockout

  • In order to provide ventilation for liquid propane, this fire table will be raised up from the ground by 1-1/2″.
  • Each corner is capped with 1-1/2″ thick plywood faced with laminate. The concrete will be built up around these pieces, which will create an air gap between the walls and the ground.
  • The control box knockout is lined up with the plumbing from the burner and secured to the inside of the form with spray adhesive.
  • A template is used to ensure the knockout is level and even to the wall.
Next: Vacuum HookupFabric Formed Concrete Fire Table - Vacuum Hookup | CHENG Concrete Exchange

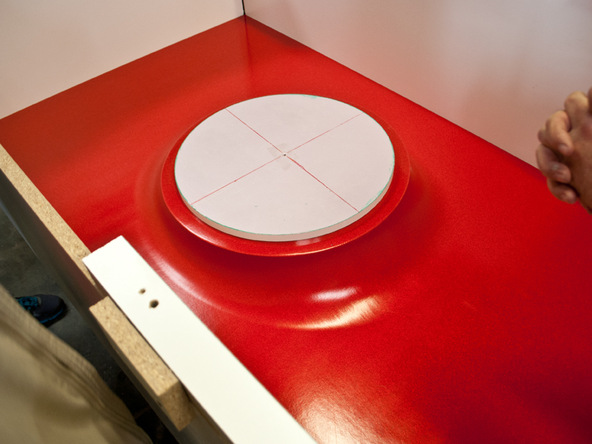
A shop vac is attached to the form base during casting to provide suction that pulls the vinyl fabric into graceful curves around the rigid foam risers.