Recycled Glass Countertops

SEVEN: SEALING

To achieve the boldest color possible, we are going to seal this recycled glass countertop section with a high-gloss color-enhancing sealer. We’ll apply two coats of Surecrete PC12 Sealer, which will provide adequate protection and performance.

If this were a kitchen or bath project, we’d likely sand and seal an additional two coats to create a higher quality finish.

What You’ll Need
  • Surecrete XS-PC12 Sealer
  • 6″ Foam Roller Cover
  • 6″ Paint Roller
  • Graduated Mixing Container – Quart
  • Stir Stick
  • Rubber Gloves
  • Orbital Sander
  • 320-Grit Sandpaper
  • Particle Mask

Step 1 – Supplies

Step 2 – Mix and Stir Sealer

  • For the first coat, you will need 6 ounces of sealer.
  • Mix 4.5 ounces of Part A with 1.5 ounce of Part B (3:1 ratio).
  • Stir the sealer for 3 minutes.

Step 3 – Apply Sealer

  • Pour a liberal amount of sealer on the countertop.
  • Spread the sealer with a high density foam roller, working the sealer into the surface and covering the entire countertop in a uniform layer.
  • Using the roller, push excess sealer off the edges.

Step 4 – Backroll

  • For an even finish, backroll the sealer with minimal pressure to knock down air bubbles.

Step 5 – Roll Edges

  • Using the roller vertically, apply sealer to all four edges.

Step 6 – Cure Sealer

  • Let the first coat of sealer cure for 24 hours before sanding and applying the second coat.

Step 7 – Sand Sealer

  • After curing, lightly roughen the surface with 320 grit sand paper.
  • Using an orbital sander makes this go quickly, but be careful not to sand too much – just enough to flatten any high spots and create a rough texture for the second coat to bond to.

Step 8 – Sand

  • Sand as evenly as possible, including the 3/4″ edges.

Step 9 – Wipe

  • Wipe the countertop down with a lint-free cloth.

Step 10 – Apply Second Coat of Sealer

  • After sanding and wiping, apply the second coat of sealer following the same steps as the first coat.

    •    Mix 6 oz. of sealer using 4.5 oz. of Part A and 1.5 oz. of Part B (3:1 ratio).
    •    Stir the sealer for 3 minutes.
    •    Apply the sealer to the entire top and edges with the roller.
    •    Backroll the sealer to smooth out the finish coat.

Step 11 – Cure and Final Polish

  • After 24 hours, the second coat of sealer is ready for light-duty service.
  • The sealer takes 48 hours to fully cure.
  • If any impurities or debris are present in the final coat, they can be sanded down and the sealer can be progressively polished up to a 2000 grit wet-sand.
Previous: Polishing

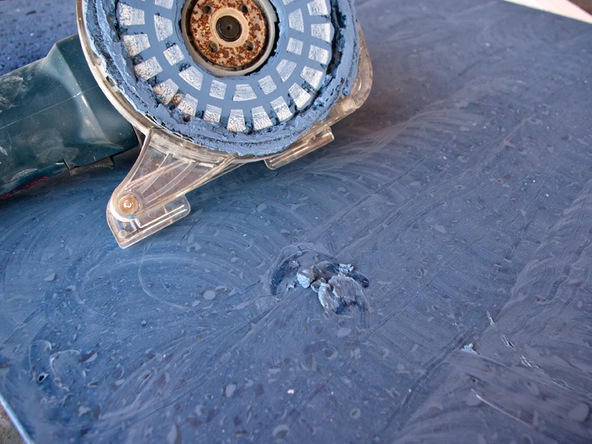
For this project we chose to use a single head wet/dry polisher, but if this project were any bigger, we’d have used a triple-head planetary polisher.

Leave a Reply

Your email address will not be published. Required fields are marked *